fbpx

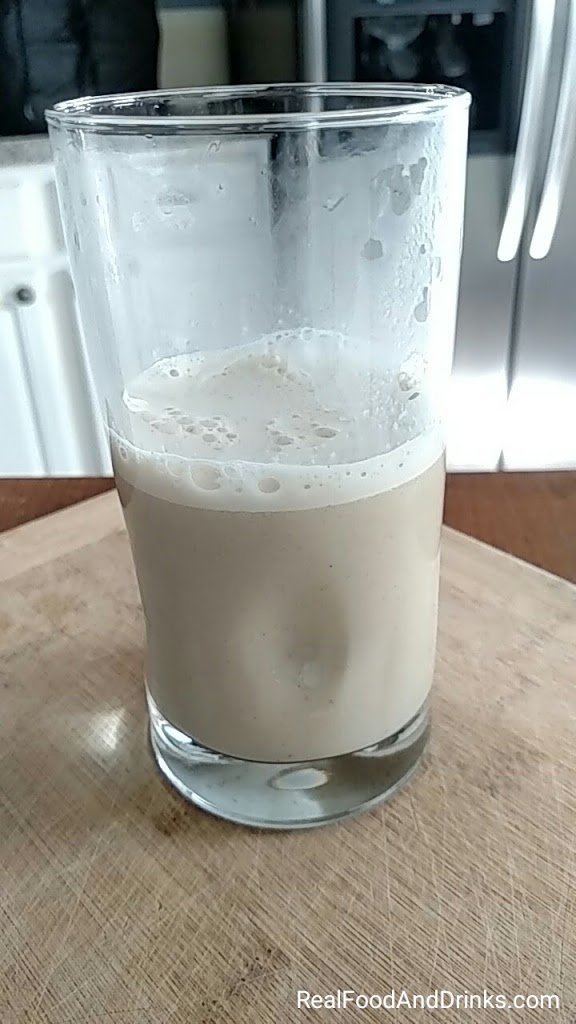
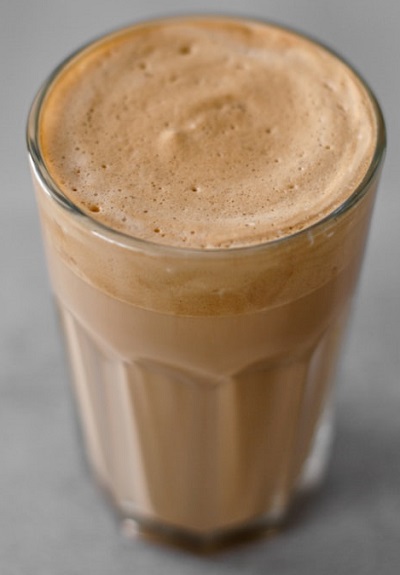
Warm Cinnamon Apple and Almond Butter Smoothie

Cinnamon Apple Almond Smoothie

Cinnamon apples are definitely a fall delight for the tastebuds. So this warm smoothie hits the spot from fall throughout the winter months.

This one takes a little extra prep work to prepare it just like I prefer it. Even though I use a Vitamix blender, I like to do a bit of the cooking on the stovetop. This is because I like to use banana as a sweetener, but I don’t want to blend a banana in the Vitamix until it becomes steamy. If you do not have a Vitamix (or blender that can handle hot liquids), blend the ingredients first and then warm them on the stovetop.

I hope this smoothies provides a great start to your day. Enjoy!

Tips: Using frozen bananas, you can also use these same ingredients to make a cold smoothie.

INGREDIENTS

  • 1 – 2 bananas, room temperature – unless you want a cold smoothie (or another sweetener of your choice)
  • 1/2 cup applesauce (or 1/2 cup fresh apples that have been stewed on the stovetop using water)
  • 1 cup of water or use plant-based milk for extra creaminess
  • 1 – 2 TBS Almond Butter
  • Dash of cinnamon spice (or any winter spice you like or a combination of more than one)
  • 1 cup of spinach (optional) – I just like to get leafy greens in any way that I can and spinach is hardly noticeable.
  • 1/2 avocado (optional) – Definitely add avocado if you do not use bananas. This will help to thicken the smoothie. If using avocado, I suggest skipping the spinach or the smoothie will be very green.

DIRECTIONS (For a warm smoothie):

  1. Warm the applesauce (apples) and water (or plant-based milk) on the stovetop until you reach a desirable temperature.
  2. Add the warm ingredients to the Vitamix and blend with the remaining ingredients.

Carrot Juice

Carrot and Apple Juice

My favorite juice is carrot juice. (Just in case you didn’t already know.)

Juicing provides a rush of energy because it’s a hydrating drink full of vitamins and minerals. Fresh juices do not require much digestion and therefore the nutrients are in your body’s cells in a matter of about 15 minutes. Even if you are new to juicing, you are likely to enjoy this recipe that’s balanced with a perfect touch of sweetness and tartness.

Tips

  • Removing apple seeds/core is not necessary (especially when using organic)
  • Use a strainer over the juice collection cup/bin or simply strain the juice before pouring into your glass for drinking.
  • It’s best to drink immediately or drink within 24 hours to get as much of the nutrients as possible.
  • Once you become familiar with this juice, try changing up the tastes and nutrients by adding in some of the optional ingredients.

If you do not YET have a juicer at home (highly recommended), you could ask your local juice bar to make this exact recipe for you. Hint: To find a local juice bar, simply GOOGLE ‘juicebar near me’ for maps and reviews using an internet web browser. (You can also try this direct link.)

Mid-day Green Smoothie

Ingredients:

1 packed cup of Kale

1/2 slice of 1 inch thick pineapple

1/2 of peeled pickling cucumber

1/2 small nectarine or peach*

1 knob ginger (you can juice using garlic press)

2 coconut milk* ice cubes

1 1/2 cups water


*High FODMAP food – remove from ingredients to achieve a Low FODMAP recipe.


Directions:
Put all ingredients into a high-speed blender such as the Vitamix and process until you reach your desired consistency.

Makes about 12 ounces.

Terramin Clay for Digestive Issues and Skin Problems Too!

I have been using Terramin Clay for 3 months now and I’ve only missed a number of days that I can count on one hand. This has been an added bonus for me. At this point, I still cannot consume regular grains, without some result that I don’t find pleasurable. By regular grains I mean corn and oats which will probably be my two favorites forever. I still look forward to the day when my body will accept these. Meanwhile, when I feel the urge to step outside of my food boundaries, I have my clay to make sure that the reaction isn’t so bad.

UPDATE: 03/26/2021 – I’ve been eating oats for a while now. I usually have a bowl of oatmeal  3-4 times each week. I still have to watch out for corn, but occasionally it’s okay in small amounts.

Don’t get me wrong, I’m not encouraging you to eat foods that aren’t good for you, and I’m especially not encouraging you to eat foods that are NOT REAL Foods – just because you have this clay. I’m just saying that I know this clay remedy works because, as I’ve mentioned before, there are times that I give in to eating a tortilla chip or popcorn knowing that my digestive system cannot handle those items. (I mean who doesn’t LOVE popcorn? I am human. – Update 2017: My body accepts popcorn without all the oils I used to add to it.)

I also believe that this clay is working to heal whatever is not right inside of my digestive system. The doctors cannot find anything, but I have constant pain on my left lower side whenever I eat dense foods (i.e. not quickly digested fruits and salads).

Mostly I just add the clay to my water and add a few dashes of cinnamon, ginger, and Stevia powder. Actually, it’s recommended that you don’t consume with much food. AND I always take my regular dose on an empty stomach.

Yet, Terramin clay is highly recommended for food poisoning and other toxic elements that might be found in the digestive system such as heavy metals and unintended toxic ingredients found in foods. This is great stuff! Don’t miss this point. I suppose you might compare this product to that of charcoal which will also draw toxins out. But charcoal is very dehydrating, so I don’t believe it’s recommended for daily use. But Terramin does more than remove toxins, it also adds many much-needed minerals to your body. It’s a 2-in-1 product of edible minerals and an internal detoxifier. Some of the main minerals are calcium, iron, magnesium (relieves stress and relaxes muscles), sodium, chromium (blood sugar regulator), selenium (antioxidant), manganese (connective tissue repair), copper, phosphorus, zinc, and potassium. Yet, the body will only take what it needs of these minerals.

One day I decided that I wanted something else at the time I was about to take the Terramin Clay, so I put together this recipe.

Ingredients:
1 tsp Terramin Clay (actually should be according to your weight)
1 TBS Nut Butter (your choice) plus  8 ounces of Water (or Nut Milk of choice)
1 Frozen Banana
1 TBS Ground Flaxseeds (or Golden Flaxseeds if using a high-speed blender such as the Vitamix)
1/4 tsp Cinnamon
1 TBS Coconut Oil
1 Date or another sweetener

“My Top” Optional Sweetener Choices:
Honey, Stevia (powder or liquid) & Dates

Directions:
Add all ingredients to a blender and blend until it reaches the consistency you desire.

Buy it here:
Below is my Amazon affiliate link to where I purchase the Terramin Clay. I’m considering becoming a reseller of this product because I believe it is so amazing! I haven’t tried the other clay products available from other companies because this is the first one I tried and it works! Also, this is the clay that Gerson Therapy recommends, so it’s the one I decided to try first.

Clay can be used in your bath water or as a paste for insect stings and skin rashes. I recently gave it to a friend for her rosacea and it cleared very nicely…even she was amazed. Read Why Terramin Works.

My “Go To” Get Going Green Smoothie

Lately, this has been my “go to” morning smoothie to “get going”.

Ingredients:
2 cups water
1/2 avocado
1 stalk celery
2 TBS nut butter
2 Medjool dates
1 TBS hemp protein
1/2 frozen banana (or add a couple of ice cubes)
1 scoop green “super food” powder

Directions:
Add all ingredients to a high speed blender. I use a Vitamix – it’s my favorite.

Options:
1. Use fresh vegetable/fruit juice or coconut water in place of water
2. I’ve been using organic cashew butter, but I also like almond butter. Almonds are the only alkaline nut and, by the way, cashews aren’t actually nuts.
3. Use different fruits such as blueberries, mangos, pineapple in place of a banana
4. Add even more “green power” by adding fresh leafy greens (spinach, kale, salad mixes)  – you might want to add a a little more liquid if you do.

Below are the results from a calorie counting program.

Calories: The calculations show 574 Calories. I need all the “healthy” calories I can get. But, if you want less calories, start my removing the nut butter before any avocado.

https://youtu.be/LSWyYpTnKjc

Orange You Happy Smoothie

This morning it took me a while to get around to preparing my first meal around 11 am. I had already had 32 ounces of water (mixed with barley green powder and 1/2 of a lemon which has now become my regular morning routine.) But at this hour of the morning,  I felt like I wanted more than just juice. So I mixed together this quick smoothie.

You can use frozen pineapple, mango* and/or blueberries which are easy to find in the frozen food section of the grocery store these days. Actually, I purchase most of my blueberries frozen because that’s almost the only way I find organic berries. But I prefer fresh pineapple and fresh mango, especially the Ataulfo mangos that are plentiful in the beginning of summer time.

This recipe will make 28 – 32 ounces and can easily be doubled.

Ingredients:
3 oranges
1 – 2 cups of pineapple (slices or chunks, and any of its juices)
1 mango*
5 mint leaves
1 cup blueberries

*High FODMAP food – remove from ingredients to achieve a Low FODMAP recipe.

Directions:

  1. Juice oranges (I used a manual juice press)
  2. Peel and remove seed from mango
  3. Toss all ingredients into a high speed blender (I use my all-time favorite, the Vitamix)
Optional Add-ins:
I added a handful of greens (kale & spinach are my favorite).

Minty Orange But Green Smoothie

I have mostly been posting all of my food creations via Instagram, but I realize that many still prefer a website to search and view recipes more easily. So I will try to post recipes here also when I Instagram them. Instagram is just a bit quicker.

This was my morning breakfast smoothie….well, what was left of it when I decided to take a photo. I believe the recipe made about two cups.


Juice the following:
2 large leaves of kale
1 small apple
1 small “pickling sized” cucumber
2 stalks of celery
1 whole orange, peeled and broken into sedments

Blend juice with the following:
1 whole orange, peeled and cut in half
1/4 cup frozen mango
1 mint leaf

Cool, sweet and refreshing. REAL YUMMY!

Kombucha

I have been making Kombucha for over 2 years. I believe it’s my husband’s favorite drink. If you like caffeine and carbonated drinks you should love Kombucha. Kombucha contains Saccharomyces Boulardii which is supposed to be a great probiotic strain that helps fight against Candida Overgrowth. When I did drink it…it seemed to help with the brain fog that is a result of Candida Overgrowth but unfortunately, I had to stop because I could not handle the caffeine. So instead, I take the capsule form of Saccharomyces Boulardii on occasion.

Kombucha is easy to make. I even grew my own “scoby” starter mushroom from a single bottle of store-bought Kombucha. The “scoby” is what you see floating at the top of the fermentation bottle. I use 1/2 gallon mason jars which will yield about 6 servings at 8 ounces each.

Ingredients:

  • Scoby Mushroom 1/2 to 3/4 inch thick
  • 2 cups of Kombucha (from the previous batch or purchase a bottle of original, plain Kombucha from the store
  • Tea bags to make 6 cups of black tea (black tea is best)
  • 1/2 cup sugar
  • Mason Jar: 1/2 gallon size
  • coffee filter (preferably non-bleached) or a clean kitchen towel (lint-free!)
  • 1 rubber band or the ring of a mason jar

    Directions:

  1. Make 6 cups of tea
  2. Add 1/2 cup of sugar and stir well
  3. Allow the tea to cool to room temperature (usually I allow to cool overnight) 
  4. Add the sweetened tea to 1/2 gallon mason jar 
  5. Add 2 cups of Kombucha (this is your starter and is necessary to begin the fermentation process and prevent the batch from spoiling) 
  6. Add the scoby, use very clean hands or a plastic spoon. Don’t touch with metal utensils.
  7. Top the jar with the coffee filter (kitchen towel) and secure using a rubber band or jar ring.
  8. Place in a cabinet away from sunlight and allow to ferment for about a week. Longer if temperatures in your home are cold and shorter if your home is warm. (I suggest tasting after 5 days.)

NOTES: Once you begin making Kombucha, you will always have a scoby and Kombucha starter to begin your next batch and possibly one to share because they just keep growing and growing. If this is your first time making Kombucha, you can purchase a scoby online, get one from a friend, or grow your own. (The “grow your own” link goes to a page that says it might be impossible to grow your own using a bottle of commercial Kombucha, but the brand “Organic Raw Kombucha” usually still has enough of the mother culture to kick off a new scoby. It has worked for me every time.)

3.2.2807

Infuse water with fruits and veggies

Looking for an alternative to juicing? Well not really an alternative because juicers perform very specific jobs, but here is another option for getting some good nutrients. Nothing like a cool drink of water, right?

I like to infuse my water with fruits and veggies from time to time when I feel like I need a real thirst quencher. I normally use cucumbers, but since I didn’t have any – this was my combination today.

This combination is safe for Candida Dieters once they have passed the first 3 weeks of absolutely NO FRUIT! (Green apples and berries are allowed after 3 weeks.)

Ingredients:

  • 2 celery sticks
  • 1/2 green apple
  • 1/4 cup blue berries
  • juice of 1 lemon
  • 2 cups filtered water
  • a couple of ice cubes, or you can place into fridge to cool

Directions:

  1. Place all ingredients into a Vita-mix or high-speed blender and blend until smooth.
  2. Filter the pulp using a strainer or a nut milk bag (what I like best).

That’s it. Simple as can be. So when you make your “infused” water, post your comments below and let others know of what combinations you create.

Note: You can always use the left-over pulp in your cooking, perhaps when making pancakes or muffins for instance.

Blend your favorite fruits and vegetables together with water and strain. Below is a good combination to try.

Ingredients
  • 2 celery sticks
  • 1/2 green apple
  • 1/4 cup blue berries
  • juice of 1 lemon
  • 2 cups filtered water
  • a couple of ice cubes, or you can place into fridge to cool

Instructions

  1. Place all ingredients into a Vita-mix or high-speed blender and blend until smooth.
  2. Filter the pulp using a strainer or a nut milk bag (what I like best).

Notes: You can always use the left-over pulp in your cooking, perhaps when making pancakes or muffins for instance.

3.2.2708

How to juice without too much pulp going to waste

Many believe that juicing produces too much waste in the form of leftover pulp. We all know that juicing helps our bodies to feel better, so here are a few suggestions that will hopefully get you back to feeling good (even conscientiously) about the whole process.
 
Option 1:  Put your pulp into a compost pile or compost bin.
 
Option 2:  Add it to your baked goods, such as quick bread recipes.
 
Option 3:  Juice green vegetables instead of root vegetables. Green vegetables leave behind less pulp.
Green juice equals less pulp
 
Notes: the green juice (in the photo) was a mixture of 3 large green leaves, 1 cucumber, 1 stalk celery and 1/2 green apple which only produces 1/3 cup of pulp but a full 12 ounces of juice
 
Yes, it’s true that carrot/apple juice is a beneficial juice (used by Gerson Cancer Therapy) and also one that’s very palatable to beginners.  But, if you’ve been juicing for a while and are ready to try some great juices for body cleansing, try a glass of green juice.