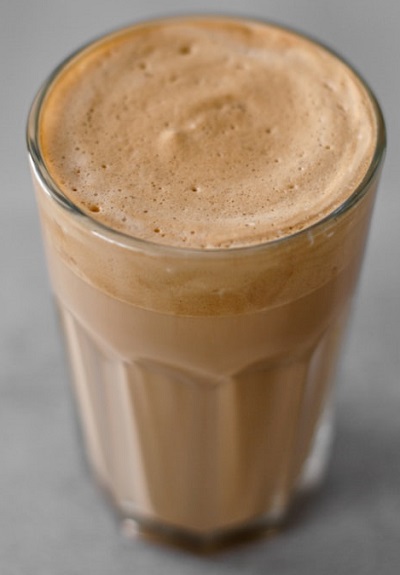
Cinnamon apples are definitely a fall delight for the tastebuds. So this warm smoothie hits the spot from fall throughout the winter months.
This one takes a little extra prep work to prepare it just like I prefer it. Even though I use a Vitamix blender, I like to do a bit of the cooking on the stovetop. This is because I like to use banana as a sweetener, but I don’t want to blend a banana in the Vitamix until it becomes steamy. If you do not have a Vitamix (or blender that can handle hot liquids), blend the ingredients first and then warm them on the stovetop.
I hope this smoothies provides a great start to your day. Enjoy!
Tips: Using frozen bananas, you can also use these same ingredients to make a cold smoothie.
INGREDIENTS
1 – 2 bananas, room temperature – unless you want a cold smoothie (or another sweetener of your choice)
1/2 cup applesauce (or 1/2 cup fresh apples that have been stewed on the stovetop using water)
1 cup of water or use plant-based milk for extra creaminess
1 – 2 TBS Almond Butter
Dash of cinnamon spice (or any winter spice you like or a combination of more than one)
1 cup of spinach (optional) – I just like to get leafy greens in any way that I can and spinach is hardly noticeable.
1/2 avocado (optional) – Definitely add avocado if you do not use bananas. This will help to thicken the smoothie. If using avocado, I suggest skipping the spinach or the smoothie will be very green.
DIRECTIONS (For a warm smoothie):
Warm the applesauce (apples) and water (or plant-based milk) on the stovetop until you reach a desirable temperature.
Add the warm ingredients to the Vitamix and blend with the remaining ingredients.
Spinach artichoke dip is expected to be cheesy, right? That’s right, so just because this is a vegan dish made using only plants, doesn’t mean it cannot trick their tastebuds. This dish will convince others, despite there not being any cheese and no trace of nutritional yeast inside of this dish. (Nutritional yeast is the usual ingredient for plant-based recipes that provide the “cheezy” flavors.) Yet, the plant-based yogurt adds tartness and the cashews and potato add the creamy texture.
My husband loves artichokes, so he was my inspiration for trying out this dish. This recipe caught my eye as I was scrolling through some of Nisha’s YouTube (RainbowPlantLife) Videos. Nisha’s recipes have all been wonderful. I’m not a huge fan of artichokes, but this was very tasty and I look forward to making it again.
Also, be sure to check out the nutrition comparison facts below for the REAL details about how this plant-based recipe is low in calories, low in fat and is cholesterol FREE!
More Inspiration:
There are so many more ways you can use this recipe to create new dishes. See the video at the bottom of this post to see the steps and two additional ways I used this dip.
INGREDIENTS
1/2 cup yellow onion, finely chopped
3 large garlic cloves, minced
10 ounces fresh spinach, chopped
12 to 14 ounces of artichokes (can or jar), marinated (or not)
1 cup plain, unsweetened dairy-free yogurt (unsweetened coconut yogurt will make for the creamiest, but I used HEB almond yogurt the first time I made this and it was good.)
1 1/2 TBSP cooking wine (Or even rice vinegar. I used a bit of both. The original recipe used distilled vinegar.)
1/2 cup raw, unsalted cashews (soak in warm water if not using a high-speed blender)
1/2 tsp fine salt (may require less if using marinated artichokes)
1/4 to 1/2 tsp ground black pepper
1/2 packed cup cooked, peeled gold potato
OPTIONAL: red pepper flakes, for garnish, pita chips or veggies for serving
DIRECTIONS
Preheat the oven to 375 F (190 C).
Add the onion, garlic, and 5 TBSP (]water to a small pan over medium-low heat. Bring to a simmer, and cook 5 to 8 minutes or until tender, stirring occasionally.
The original recipe says to add the spinach to the pan in small batches, stirring and tossing the spinach until it is well cooked and wilted before adding the next batch. Repeat until all the spinach is cooked well. This will take about 10 minutes. Turn the heat off. But, since I chopped the spinach using the pulse function of the food processor, I added all to the pan at once and stirred only a few minutes to allow it to wilt. Then I turned off the heat.
The original recipe says to roughly chop the artichokes into quarters. But my artichokes were already quartered and I put them into the food processor to chop even more.This will release lots of liquid, so drain the excess. Squeeze out the excess liquid so it doesn’t end up watery. I used a fine strainer and pressed the artichokes into the strainer using the back of a spoon. Add the artichokes to the cooked spinach mixture, and set aside.
Add the yogurt, vinegar/wine, cashews (soaked if necessary), salt, and pepper to a high-powered blender or food processor. Starting slowly, blend the ingredients. Add the potato also to the blender, blend on high until completely. smooth. Scrape the sides if needed, and blend once more. Pour over the spinach and artichoke mixture and stir to combine well.
Pour the mixture into a 9-inch cast-iron skillet, pie dish, or an 8-inch square baking dish. Bake uncovered for 25 minutes or until the top looks firm and set and is bubbly. Let cool for 5 to 10 minutes. For a kick, add some red pepper flakes on top before serving with pita chips or veggies.
NOTES/TIPS
A food processor will make this an easy and quick recipe. I used one to chop and mince onions before cooking. I also used it to chop the artichokes and to chop the spinach (each chopped separately).
Look for organic potatoes to avoid pesticides.
As always, don’t forget to taste your dish prior to calling it “done” (of course, before baking it)
1 pound of hashbrowns (or shredded potatoes, see notes/tips below)
8-10 ounces fresh spinach, chopped
8 ounces mushrooms, sliced (or even finely diced)
1/2 of a medium onion, chopped
dried parsley flakes (to be sprinkled on top)
Cheezy Sauce:
2 cups plant-based milk
½ cup raw cashews (or use 1/4 cup of cashew flour)
3 tablespoons cornstarch**
¼ cup nutritional yeast flakes
1 teaspoon onion powder
1 teaspoon garlic powder
1 tablespoon tahini
1 tablespoon miso paste
2 teaspoons apple cider vinegar
1 teaspoon Dijon mustard
1 teaspoon lemon juice
½ teaspoon sea salt (or to your taste preferences)
¼ teaspoon black pepper
**Try to find a NON-GMO cornstarch
DIRECTIONS
Preheat the oven to 375°F.
Saute the mushrooms and onions in a bit of water/broth over medium-high heat until tender the onions become translucent and caramelized. Add water/broth as needed to prevent sticking.
Combine the “cheeze” ingredients in a high-speed blender and process until smooth. Taste to make sure it’s to your liking.
Pour half of the blended cheese sauce into the bowl of hash browns and mix until thoroughly combined.
Line a 9-inch square baking pan with parchment paper. Begin to add layers: “cheeze” sauce, potatoes, onions & mushrooms, chopped spinach. Make two layers and top it all off with “cheeze” sauce.
I like to top with more parchment paper (but this is optional) bake for 30 minutes, and then remove the top so that it can brown and the sauce can thicken. (Or you can simply bake uncovered in the oven.)
Sprinkle with dried parsley.
NOTES/TIPS
I think the onions are the star of this dish that adds the most flavor. I like to add a splash of balsamic vinegar to help with the caramelization of the onions. (You can use any vinegar you have for cooking.)
I like to salt and pepper the potatoes as I layer them.
Taste your “cheeze” sauce prior to using it in the dish so that you can make adjustments to suit your taste buds.
Look for organic potatoes to avoid added ingredients and preservatives.
If shredding your own potatoes, make sure to dry them well – using a kitchen towel or paper towels.
I’ve also used sliced potatoes to make this recipe. Use a mandoline slicer for best results
I made the dressing not knowing what I would use for the salad ingredients, but I’m happy that I found this Cucumber Caesar Salad Dressing combination and I wanted to share it with you right away.
I decided to try this dressing because my daughter likes Caesar salad dressings.
And I enjoy cucumbers, especially when I can find really great tasting ones. That usually means a trip to the Farmers Market though. Yet, sometimes I find that the mini packaged cucumbers taste good too. Yet, the best cucumbers I’ve ever had were those that I grew in my own garden. I wish you the best in finding some good cucumbers for this salad.
Caesar Salad Dressing
Ingredients:
1/4 cup raw cashews
1/8 cup raw pine nuts, or raw sesame seeds (I didn’t have either, so I used tahini paste.)
3 TBSP freshly squeezed lemon juice
1 clove garlic
1 tsp miso paste (I used a mellow white. See note* below.)
1/2 tsp sea salt
1/2 tsp kelp granules (I used powdered kelp.)
1 tsp honey, or liquid sweetener of choice
1/4 cup of water (I added more for a thinner version.)
1 TBS extra virgin olive oil, optional (Omit for oil-free version).
Directions:
Mix all the ingredients in a small food processor or in a blender until smooth.
*Note about miso paste:If miso paste is kept in the freezer it will last for at least a year. It never freezes solid, so it’s easy to measure out what you need as you need it.
SERVE: I served over a salad of sliced cucumbers, split cherry tomatoes and chopped celery. I will definitely make this Cucumber Caesar Salad again in the near future (like tomorrow).
It is so YUMMY! It’s quick and easy. I hope you will try it soon.
This chickpea salad spread has two options. It can be prepared as “chicken” salad or “tuna” salad substitutes. See “tuna” flavor salad add-in options below under the ingredients section.
Ingredients:Of course substitutions can be made for many of these ingredients, but this list serves as a general guideline.
One 15 ounce can of chickpeas (or 1 1/2 cup home cooked), drained and rinsed
1 stalk of celery
1 green onion (or 2 TBS red/white/yellow onion or 1 scallion), finely chopped
1 – 2 TBS tahini (or homemade vegan mayo or any dressing of your choice)
1 1/2 tsp mustard of choice
1/4 cup of nuts (pecans, walnuts, almonds, etc)
1 – 2 TBS dried cranberries
2 tsp fresh lemon juice
dash of paprika
salt and pepper, to your liking
Add-ins for the “tuna” flavor:One or the other will do just fine
1 sheet of nori seaweed, crumbled
4 mini sheets of any nori seaweed snacks
1/2 – 1 tsp of kelp powder
Directions:
Add all the ingredients to a food processor then mix/chop. Or mash the chickpeas with a fork and then add remaining ingredients.
SUCCESS!
I offered the chickpea “chicken” version salad to someone who had never tried anything similar to this before. I was informed that he was not a fan of hummus. I put the spread into a tortilla wrap with avocado and jalapenos. After the first bite, the response was, “Not bad.” But when the plate was empty, he asked for the recipe.
Yes, vegan meringue is possible using aquafaba. Aquafaba is the left over water after cooking dried beans or legumes. The only one I’ve ever used is that which I have after cooking chickpeas/garbanzo beans. I think chickpea water is the most popular one for most recipes. (See the aquafaba recipe below.)
I cannot eat pure sugar, so these cookies are not for me, but I wanted to make a dessert that my daughters might enjoy and for those of you who might enjoy them too. But really, I just wanted to try to try a substitute for egg whites to create a meringue cookie. And it works great!
Oh, and before you get started, the recipe below calls for the use of a pastry bag with a star (decorative) end. You can use a pastry bag with a hole cut in the bottom. Or simply use a spoon to plop the meringue onto the cookie sheets. Don’t worry…these cookies will taste the same once baked no matter what “shape” they are in.
1. I added ginger spice to my last batch and thought it made a good addition.
2. You can also use a dehydrator after the hour or so baking in the oven. Some say that you can use a dehydrator for the whole baking process, but I have not tried that yet.
Ingredients
3/4 cup aquafaba
1/4 teaspoon cream of tartar
1/2 cup granulated, demerara, or turbinado sugar
1 tsp vanilla extract
pinch of salt (optional)
Food coloring (optional)
Instructions
Preheat oven to 200 degrees F (or lowest setting). If your oven won't go that low, keep the over door ajar.
Line two cookie sheets with parchment pape.
Whip the aquafaba and the cream of tartar together for about 3 - 4 minutes.
Gradually add in sugar (about 1 TBS at a time, allowing it to dissolve between additions), vanilla and salt, if using. (and any other flavorings, see notes below). Continue to beat for about 5 additional minutes.
3. Add in food coloring, just a few drops at one time. (It won't require much.)
Mixture should begin to form stiff peaks and it will actually become thick, fluffy and shiny. (Just make sure that all the sugar is dissolved.)
Fill a large pastry bag fitted with a large star end (or whatever you have and can even just cut a small hole in the end of the bag).
Fill the bag with meringue and pipe onto baking sheets. (Note: These cookies will not spread.)
Bake in the over for about 1 hour to 1 hour and 15 minutes. Turn the oven off after time has elapsed, but do not open the door. Allow the cookies to cool completely with the door closed for 1 to 2 hours.
Once baked and cooled, the cookies will be crispy. Store in an airtight container to keep away from moisture or they will lose their crispiness. Also, keep them away from heat because they will melt.
Leftover Vegan Meringue…
I had left over meringue, so I decided to make vegan lemon meringues desserts. Not pie, because I didn’t want to make a crust. I used this recipe . This recipe also contains good tips on making the lemon curd thicker (such as using agar agar flakes). I simply used the basic recipe even without the vegan butter. There is also a link to vegan pie crust recipe and suggestions for store-bought brands.
Leftover aquafaba…
I always like to keep aquafaba available for use in some requires that list eggs as an ingredient. I often use aquafaba in pancakes and cookies. But, if I don’t use the aquafaba right away, I freeze some in ice cube trays for later use.
How to make aquafaba
I enjoy using chickpeas in many recipes, therefore, I always have aquafaba on hand. I think chickpeas and pinto beans are my favorite legumes. Although, I’ve never used pinto aquafaba in any recipes…I supposed that you could, but it would give it a pink tint for sure.
I prefer to soak the chickpeas overnight (or at least 8 hours).
Note: The cooking times below refer to soaked chickpeas.
Drain off the soaking water, prior to cooking.
Instantpot: Cover with 1 inch of water. Stovetop: Cover with 2 inches of water.
Instantpot: Cook for 13 minutes.
Stovetop: Bring to boil for 1 minute, then simmer on low for about an hour.
I usually use a spoon to remove some of the froth that appears in the pot after cooking.
Strain the aquafaba into a container for later use.
I usually put the chickpeas into the freezer for later use in soups, salads, hummus, stir-fries, tacos, and making tortillas/wraps.
This technique makes creating a mid-day lunch or dinner snack easy. It also helps with creating a variety in your meals.
What I like to do is put various toppings together into containers and add the salad dressing too. Ideally, choose any ingredients that you would like to marinate in the salad dressing. For me, this is everything other than nuts and soft lettuces, but I will add kale and cabbages because they are tougher lettuces.
Toppings in this photo: beans – edamame and chickpeas, fresh sweet corn, zucchini, artichokes, bell peppers, and olives.
Tex-Mex is my favorite without a doubt. I really enjoy corn tortillas, and my preference is organic corn tortillas. Yet, it’s so difficult to find organic corn tortillas or the right organic cornmeal (masa) to make my own tortillas (still looking though). But this tortilla recipe is just as satisfying. It’s very mild tasting so it would make a good wrap for anything you wish to put inside. It’s my go-to recipe for making tortillas/wraps.
TIP: The original recipe that I used when I first began making these tortillas is from Elavegan, but it uses chickpea flour. One day when I didn’t have any chickpea flour I decided to try fresh, cooked chickpeas instead – and it worked! I use fresh chickpeas all the time now. I think fresh chickpeas adds better taste and texture. Also saves money!
So, I’m listing both options for you.
Option 1 – uses fresh chickpeas and it requires rolling out dough or using a tortilla press if you have one.
Option 2 – uses chickpea flour and as the original recipe recommends, it allows you to create a pourable dough. So these are actually cooked in the same manner as pancakes.
Recipe Option 1 – Using fresh chickpeas
Note: When pressing the tortillas I either use plastic food storage bags (as shown in the video below) or parchment paper to prevent the dough from sticking. If using parchment paper you can remove the paper from one side and lay that side down onto the griddle. Then once that side begins to cook, you can easily peel the parchment paper from the top and then flip the tortilla to cook the other side. (I like the ease and convenience of using parchment.)
Ingredients
1 cup chickpeas, rinsed (they should be cooked until very tender, or canned)
1/2 cup tapioca starch
1/4 – 1/3 tsp salt (Definitely optional.)
Any additional seasonings/herbs you would enjoy
Start without any water/liquid/chickpea water (They probably contain enough moisture already.)
Instructions
Preheat stove-top griddle/pan to medium/high heat.
Add chickpeas to a food processor, and process until very grainy.
Add tapioca starch and pulse to mix in, adding water as necessary to form a soft dough. (If you add too much water, you can add more starch.)
Divide into 4 or 5 balls. Then roll/press the dough into tortillas.
Cook on the griddle. Depending on how hot the griddle is it may take as look as 1 minute per side.
Recipe Option 2 – Using chickpea flour
Ingredients:
1 cup chickpea flour
1/2 cup tapioca starch
1/4 to 3/4 cup of water, to start
1/4 – 1/3 tsp salt (Definitely optional.)
Any additional seasonings/herbs you would enjoy
Instructions:
Add all the ingredients to a food processor and begin to process
Add more water if necessary while processing to form a batter which should be pourable.
Pour the batter onto a hot griddle/pan to the desired size. You may need to spread a bit with the back of a spoon or spatula.
Cook until bubbly on top (just like pancakes) and flip over to cook the other side.
Both options will provide a very flexible tortilla/wrap!