fbpx

Vegan Cheese Sauce – Upgraded!

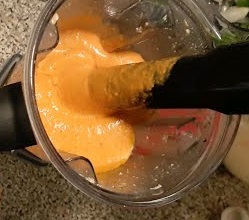
CheezeVitaMix

Have you ever heard of “cheese” sauce that is made with “oats”? Here are three reasons why this is a winner in my book:

1 – Much cheaper than cashews (which was the nut of choice for making “cheeze” sauce).

2 – Extremely low-fat. About 1.5 grams for the entire 6 cups!  By today’s standards, that’s really “no-fat”, but we know that all food groups contain some amount of fat, even fruits.

3. It’s delicious!

This is definitely my new “goto”, UPGRADED “cheese” sauce. I am updating this recipe to reflect the additions that I made to the original recipe. 

Ingredients:

  • 2 cups rolled oats
  • 1/2 cup nutritional yeast flakes
  • 1/4 cup cornstarch
  • 2 teaspoons onion powder
  • 1/2 tsp garlic granules (or 1 roasted garlic clove – my addition)
  •  2 teaspoons sea salt
  • 1/2 tsp paprika (my addition)
  • 1 12-oz. jar Roasted Red Bell Peppers in water for the lowest fat possible
  • 1 tablespoon lemon juice
  • 1/4 teaspoon Pecan or Apple liquid smoke (optional, I didn’t use this)
  • 4 cups warm water

Note: Make sure to cook the cheese sauce until it’s steamy to create the thickest sauce.

Tip to make this more TEX-MEX: The first time I made this I substituted salsa for some of the roasted red bell peppers. Or you can simply add to the “cheese” sauce once done.

Directions:

  1. Dump all the ingredients into a high-speed blender (that can cook contents).
  2. Blend until steam forms and the machine will sound like it has completed the job. (The sound changes from blending to like it’s just spinning its wheels). This takes about 5 minutes depending on how warm/hot the water is that you start with.
  3. Voila! You are done. Pour into a bowl or jar that you can easily scoop out of. It will thicken even more as it cools.

I used this “cheese” sauce in a Tex-Mex casserole. (See the recipe.)

CheezeyCasserole

I’m not sure how I came across “Jill’s 5-minute Game Changer [Vegan] Cheese Sauce “! I had my doubts for sure, but in her video, she was so confident that I had to give it a try and boy am I glad I did. My video shows TEX-MEX varieties. Adding salsa truly makes this a game-changer cheese sauce.

Vegan Meringue Cookies – Using Aquafaba

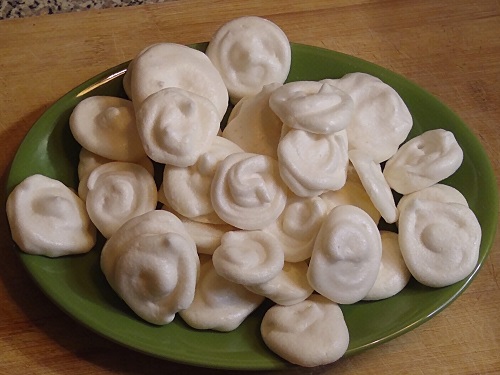
meringue cookies

Yes, vegan meringue is possible using aquafaba. Aquafaba is the left over water after cooking dried beans or legumes. The only one I’ve ever used is that which I have after cooking chickpeas/garbanzo beans. I think chickpea water is the most popular one for most recipes. (See the aquafaba recipe below.)

I cannot eat pure sugar, so these cookies are not for me, but I wanted to make a dessert that my daughters might enjoy and for those of you who might enjoy them too.  But really, I just wanted to try to try a substitute for egg whites to create a meringue cookie. And it works great!

Oh, and before you get started, the recipe below calls for the use of a pastry bag with a star (decorative) end. You can use a pastry bag with a hole cut in the bottom. Or simply use a spoon to plop the meringue onto the cookie sheets. Don’t worry…these cookies will taste the same once baked no matter what “shape” they are in.

Once baked and cooled, the cookies will be crispy. Store in an airtight container to keep away from moisture or they will lose their crispiness. Also, keep them away from heat because they will melt.

Leftover Vegan Meringue…

I had left over meringue, so I decided to make vegan lemon meringues desserts. Not pie, because I didn’t want to make a crust. I used this recipe . This recipe also contains good tips on making the lemon curd thicker (such as using agar agar flakes). I simply used the basic recipe even without the vegan butter. There is also a link to vegan pie crust recipe and suggestions for store-bought brands.

Leftover aquafaba…

I always like to keep aquafaba available for use in some requires that list eggs as an ingredient. I often use aquafaba in pancakes and cookies. But, if I don’t use the aquafaba right away, I freeze some in ice cube trays for later use.

How to make aquafaba

I enjoy using chickpeas in many recipes, therefore, I always have aquafaba on hand. I think chickpeas and pinto beans are my favorite legumes. Although, I’ve never used pinto aquafaba in any recipes…I supposed that you could, but it would give it a pink tint for sure.

I prefer to soak the chickpeas overnight (or at least 8 hours). Note: The cooking times below refer to soaked chickpeas.
Drain off the soaking water, prior to cooking.
Instantpot: Cover with 1 inch of water. Stovetop: Cover with 2 inches of water.
Instantpot: Cook for 13 minutes. Stovetop: Bring to boil for 1 minute, then simmer on low for about an hour.
I usually use a spoon to remove some of the froth that appears in the pot after cooking.
Strain the aquafaba into a container for later use.

I usually put the chickpeas into the freezer for later use in soups, salads, hummus, stir-fries, tacos, and making tortillas/wraps.

More Vegan “Sweet” Desserts

Chickpea Tortillas (Wraps)

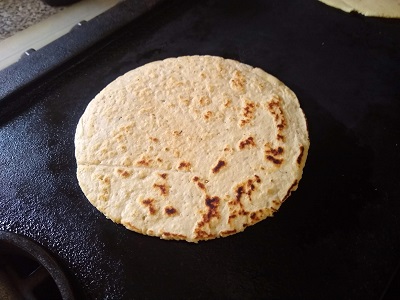
chickpea tortilla

Tex-Mex is my favorite without a doubt. I really enjoy corn tortillas, and my preference is organic corn tortillas. Yet, it’s so difficult to find organic corn tortillas or the right organic cornmeal (masa) to make my own tortillas (still looking though). But this chickpea tortilla recipe is just as satisfying.  It’s very mild tasting so it would make a good wrap for anything you wish to put inside. This is my go-to recipe for making tortillas/wraps.

TIPS

1. The original recipe that I used when I first began making these tortillas is from Elavegan, but it uses chickpea flour.  One day when I didn’t have any chickpea flour I decided to try fresh, cooked chickpeas instead – and it worked! I use fresh chickpeas all the time now. I think fresh chickpeas adds better taste and texture. Also saves money! (See below for a cost comparison.)

2. Substitute cassava flour for tapioca flour. Use only 1/4 cup cassava in the following recipes.

3. Add any additional seasonings/herbs you would enjoy to these recipes.

Recipe Options:

Recipe 1  uses fresh chickpeas and it requires rolling out dough or using a tortilla press if you have one.

Recipe 2  uses chickpea flour and it also requires rolling out dough or using a tortilla press if you have one.

Recipe 3 uses chickpea flour and as the original recipe recommends, it allows you to create a pourable dough. So these are actually cooked in the same manner as pancakes.

Recipe 1 – Using fresh chickpeas (Video Below)

Note: When pressing the tortillas I either use plastic food storage bags (as shown in the video for recipe option 2 below) or parchment paper to prevent the dough from sticking. If using parchment paper you can remove the paper from one side and lay that side down onto the griddle). Then once that side begins to cook, you can easily peel the parchment paper from the top and then flip the tortilla to cook the other side. (I like the ease and convenience of using parchment. See the video for recipe option 1 below).

Ingredients:

  • 1 cup chickpeas, rinsed (they should be cooked until very tender, or canned)
  • 1/2 cup tapioca starch
  • 1/4 – 1/3 tsp salt (Definitely optional.)
  • Any additional seasonings/herbs you would enjoy
  • Start without any water/liquid/chickpea water (They probably contain enough moisture already.)

Instructions:

  1. Preheat stove-top griddle/pan to medium/high heat.
  2. Add chickpeas to a food processor, and process until very grainy.
  3. Add tapioca starch and pulse to mix in, adding water or aquafaba (chickpea liquid) as necessary to form a soft dough. 
  4. Divide into 5 or 6 balls (about 55 g each). Then roll/press the dough into tortillas. 
  5. Cook on the griddle. Depending on how hot the griddle is it may take as look as 1 minute per side.

Recipe 2 – Using chickpea flour (Video Below)

Ingredients:

  • 1 cup chickpea flour
  • 1/2 cup tapioca starch
  • 1/4 cup water (If you add too much water, you can add more starch.)
  • 1/4 – 1/3 tsp salt (Definitely optional.)
  • Any additional seasonings/herbs you would enjoy

Instructions:

  1. Add all the ingredients to a food processor and begin to process

Recipe 3 – Using chickpea flour to create a POURABLE BATTER  (Use this method if you do not have a tortilla press or a rolling pin.)

  • 1 cup chickpea flour
  • 1/2 cup tapioca starch
  • 1/2  – 3/4 cup water/chickpea water (aquafaba) – If you add too much water, you can add more starch.
  • 1/4 – 1/3 tsp salt (Definitely optional.)
  • Any additional seasonings/herbs you would enjoy

Instructions:

  1. Add all the ingredients to a bowl, start with 1/2 cup of water adding more slowly as needed. Mix with a handheld blender or use a spoon/whisk.
  2. Pour the batter onto a hot griddle/pan to the desired size. You may need to spread a bit with the back of a spoon or spatula.
  3. Cook until bubbly on top (just like pancakes) and flip over to cook the other side.

Pourable batters or rolled/pressed dough will similarly provide a very flexible tortilla/wrap!

LINKS TO PRODUCTS ON AMAZON:

Tortilla Press: https://amzn.to/2GIinsT

Chickpea Flour: https://amzn.to/3jRCnYk

Tapioca Flour: https://amzn.to/33OyqOq

Cassava Flour: https://amzn.to/2Nw6U2J  (Tapioca Flour Substitute)

Video: Recipe Option 1 – Using canned (cooked) chickpeas


Video: Recipe Option 2 – Using chickpea flour

Please subscribe to be notified when new videos are posted.

Cost Comparison:

Each of the recipes listed here uses 20 cents of chickpea flour (1 – 1lb bag of tapioca flour at $3)

Option 1 – Using chickpea flour = $1.53/recipe

1 lb flour at $3.99 yields 18 tortillas, 6 tortillas will cost about $1.33

$1.33 + .20 (cost of tapioca flour) = $1.53

Option 2 – Using canned chickpeas = $1.00/recipe

1 can at 80 cents = 1 1/2 cups of chickpeas yield 6 tortillas

.80 + .20 (cost of tapioca flour) = $1.00

Option 3 – Using 1 lb dried chickpeas to prepare chickpeas at home = 40 cents/recipe

1 lb dried chickpeas at $1 = 8 cups of chickpeas which would yield 30 tortillas, 6 tortillas will cost about 20 cents (1/5 of the recipe)

.20 + .20 (cost of tapioca flour) = 40 cents

Buckwheat and Millet Pancakes

This is my go-to recipe for breakfast (in addition to a morning smoothie which I usually have while cooking pancakes). Notice there aren’t any sweeteners, gums or extra fillers in this gluten-free recipe. Just the basic ingredients and I enjoy them with unsulphured molasses, a touch of maple syrup and cold-pressed flax seed oil (an optional boost of Omega-3’s).

Ingredients:
1 cup buckwheat flour
1 cup millet flour
2 TBS ground flax seeds (can add up to 4 TBS)
2 tsp cinnamon
1/2 tsp sea salt
1 tsp apple cider vinegar (or lemon juice)
2 cups nut milk (or water will work just as well)
2 tsp baking powder

Directions:

  1. Heat a hot griddle or skillet over low to medium heat.
  2. Mix all ingredients together well, except for the baking powder
  3. Allow the mix to sit about 2 – 3 minutes for the flax seeds to help bind the mixture. (The ground flax seeds are a plant-based substitution for eggs.)
  4. Add a bit more nut milk or water to attain the consistency needed to pour the pancake batter onto a griddle.
  5. Add baking powder and mix slightly. ( You can add another tablespoon of water to help the powder dissolve easily.)
  6. Add just a touch of oil if needed(I prefer coconut oil when needed) to your griddle or skillet.
  7. Cook the pancakes. (They should be easy to pour from the bowl and form round circles on the cooking surface. If not, you can use a spoon to spread a bit or add more liquid).

Note: I make my own buckwheat and millet flours using a Vitamix grain container that has a specific blade for grinding grains.

Suggestion: Mix all the dry ingredients together and store in an airtight container. To use, add liquid of choice in 1:1 ratio of dry mix. Allow to sit for 1 minute. Then, if using, add lemon juice or apple cider vinegar. Cook on hot griddle.